MNIST sensitivity to displacement
24 hours ago, I thought a simple feedforward network is enough for recognizing handwriting by using a network trained with MNIST - CRAP!
My goal is to create a header for this blog which is basically just a HTML5 canvas in which you can write digits from 0 to 9 using your mouse. I then tought I could pass them to a simple feedforward neural network and get an exact guess which digit you have written down. Kind of a cool welcome header I think!
How I coded the canvas can be read in another blog article - which first has to be written… ![]()
But in this article I like to focus on feedforward nets. Disclaimer: I do not have great experience
with neural networks so what I present here are just my observations and nothing
of that is scientifically proven! ![]()
Neural network = Magic?
Let’s have a look at how those feedforward networks work. They are the simplest nets I came across so far, but they explain the idea behind neural networks pretty good.
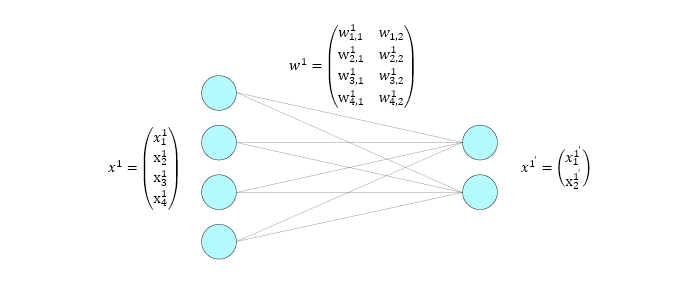
As you can see we take \( x^1 \) as our input vector. It has \( 4 \) values in it \( x_{1}^1 \), \( x_{2}^1 \), \( x_{3}^1 \), \( x_{4}^1 \). Those \( 4 \) values can represent anything that we can express with \( 4 \) float numbers. In case of my header \( x^1 \) has \( 784 \) values which represent the \( 28*28 \) pixels of the digit you have drawn. Each pixel has a value from \( 0 \) to \( 1 \) corresponding to its gray color value.
From this input vector \( x^1 \) we want to compute an output vector \( x^{1’} \) with two values \( x_{1}^{1’} \) and \( x_{2}^{1’} \). In my header example this would be a vector of \( 10 \) values representing the propability for each digit from \( 0 \) to \( 9 \) to be that one digit you have written inside the canvas.
The only thing missing is the computation which takes the inputs and computes the outputs. And this computation is pretty simple, just a matrix multiplication. In the current example with the \( 4 \) inputs our output value for \( x_{1}^{1’} \) would be:
and for \( x_{2}^{1’} \):
Those \( w \)’s are so called weights, they decide which value from the input vector is how much important to compute the output. These weights are randomly initialized and are trained. I dont want to go into great detail how this training happens, but I will write another blog atricle about this. All that is important for this article is that each input value is connected with each output value by one individual weight.
Let’s destroy it
And that is important, because one of the issues I am having with my canvas header is that you write the digit not exactly centered but a bit shifted to some side of the drawing area. And the MNIST dataset which I use for training contains handwritten digits which are prefectly centered and antialiased. Antialiasing isn’t what I want to focus on now but the centering is. Because the input vector for a 0 shiftet to the left of the image looks different than a 0 which is centered, the net outputs different propabilities for both of them. I will give you a short demonstration of that.
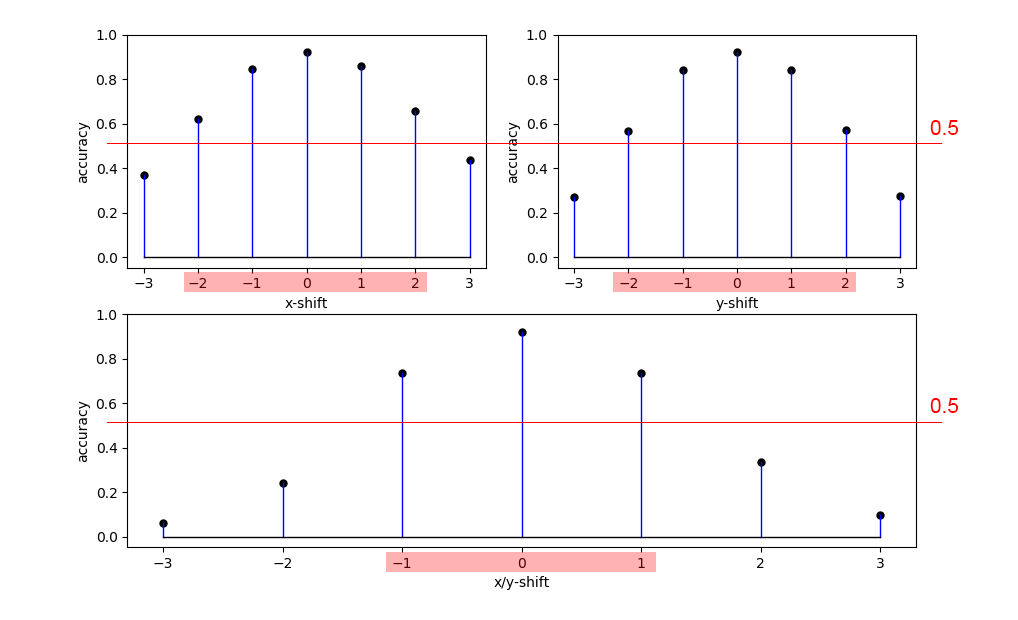
What you see are 3 charts which give you the accuracy (percentage of correct guesses within all test images) with respect to the shift of the image. I have trained the network using the training image dataset, and shiftet the whole test image dataset from -3 to 3 on the x-axis (x-shift), on the y-axis (y-shift) and on both x and y axis simultaneously (x/y-shift). Without shifting you can see that the accuracy is about 92%. But moving all the images just one pixel on the x-axis, results in a drop of about 5% accuracy, moving the same image on both axes just one pixel results in a drop of about 19% to only 73% accuracy, which is already relly bad. If I move the image 2 pixels on both axes the network is almost unable to guess any of the images correctly as the accuracy is only about 35%!
This is the code I used to shift the images. It just adds a padding around the image and then uses numpy roll to shift the image.
# shift = (xshift, yshift)
# images = mnist.test.images
def shift_images(images, shift):
    # reshape into matrix
    images_reshaped = images.reshape(10000, 28, 28)

    (x_shift, y_shift) = shift

    # None does not affect slicing
    x_slice_min = None if x_shift >= 0 else -x_shift
    y_slice_min = None if y_shift >= 0 else -y_shift

    x_slice_max = None if x_shift <= 0 else -x_shift
    y_slice_max = None if y_shift <= 0 else -y_shift

    # right/left and bottom/top pad images with zeros
    images_padded = np.zeros((10000, 28 + abs(y_shift), 28 + abs(x_shift)))
    images_padded[
        :,
        y_slice_min:y_slice_max,
        x_slice_min:x_slice_max] = images_reshaped

    # roll (shift) images to the right/left
    images_shifted = np.roll(images_padded, x_shift, axis=2)
    # roll (shift) images to the bottom/top
    images_shifted = np.roll(images_shifted, y_shift, axis=1)

    # reshape backwards
    return images_shifted[
        :,
        y_slice_min:y_slice_max,
        x_slice_min:x_slice_max].reshape(10000, 28 * 28)
Conclusion
We have seen that feedforward nets are just a simple matrix multiplication (neglecting the activation function and the fact that we can have multiple layers). My simple feedforward net works great when I use the provided test images (about 92% accuracy). But when I move the images just about 2 pixels up and to the left, accuracy drops to 35%. This happens because the moved vector looks completely different to the net! The next time I try to fix this using convolutional neural nets.
Thank you for reading!